01. What is Shader

Definition of Shader
The very first question I used to get in my class was "what the heck is shader?" Looking back, I also asked this same question when I heard about shader first few times, but no one was able to give me the one sentence explanation that made sense to a noob like me. I eventually figured it out, and I think the following sentence is the easiest way to define what shader is.
Shaders are functions which calculate the position and colour of a pixel on screen.
Still not clear enough? Maybe it is easier to understand if we look at where shaders are used in a modern graphics pipeline.
Simplified 3D Graphics Pipeline
Only vertex and pixel shaders are covered in this book. So, let me quickly show you how these shaders are used in a modern 3D graphics pipeline.
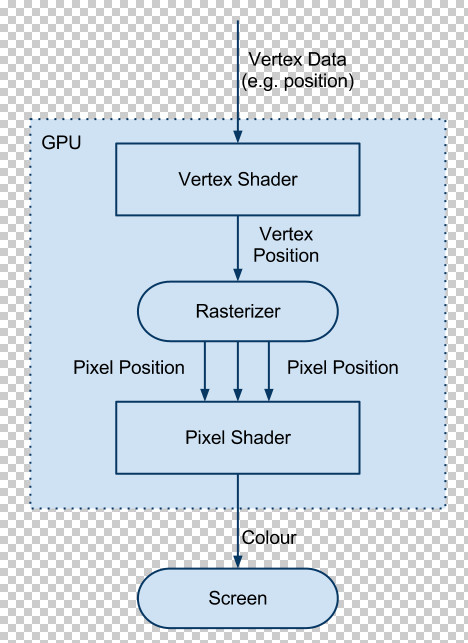
One of the reasons why 3D pipeline exists is to display a 3D object onto a 2D screen. First, take a look at Figure 1.1, which shows an overly simplified 3D graphics pipeline. [1]
.png)
Figure 1.1 Overly simplified 3D graphics pipeline
In figure 1.1, what a vertex shader takes as input is a 3D model itself. A 3D model is usually represented with polygons, which are nothing more than a collection of triangles. To make a triangle, you need 3 vertices, right? So, you can just say the input for a vertex shader is an array of vertices, instead. A-ha! Now you know why it is called vertex shader.
Then what does a vertex shader do? The most important responsibility of a vertex shader is transforming vertices of a 3D object into the screen space. You can compare this to how a painter captures real-world scenery onto a canvas. Have you heard of perspective drawing? Even if you draw exactly same two objects onto the canvas, the final sizes on the canvas can be different based on the distance between each of objects and your eyes. In other words, close-by objects look bigger and far-away objects look smaller.
In graphics, we like to say that those two objects had the same size in world space, but now they have different sizes in screen(=canvas) space. Well, do not worry about these spaces. We will learn more about it in the next chapter. I just wanted to tell you that vertex shaders must transform an object from one space to another.
Remember I told you a 3D model is basically a bunch of vertices? So if you transform all the vertices that make up a 3D model one by one, it is same as transforming the 3D object itself. This is exactly how vertex shaders work. Then, how many times a vertex shader will be executed? Exactly. Just same times as the number of vertices in the model.
We can sum up the last paragraph with the following sentence:
The main role of a vertex shader is transforming each vertex's position into another space.*
So, one thing a vertex shader must output at the end of its execution is the vertex position in screen space . Every three of these vertex positions make a triangle, also in screen space. [2]
Now, can you tell me how many pixels would be inside of each triangle? The screen is made of pixels, so we should know how many pixels we need to draw and where we need to draw them, right? This is what the rasterizer unit does. Rasterizer groups every three vertex positions a vertex shader outputs and makes a triangle to find out how many pixels are in it. So now you can guess how many times the pixel shader should be executed, right? Of course, as many times as the number of pixels the rasterizer finds out.
Then, what would be the main work of pixel shader? Here is a hint. This is the last stage of the 3D graphics pipeline before reaching to the screen.
The main responsibility of a pixel shader is to calculate the final colour on screen.
If you combine the roles of vertex and pixel shaders, you finally get the definition I mentioned earlier:
Shaders are functions which calculate the position and colour of a pixel on screen.
Even though we tried to define what shader is, I honestly do not think most beginners would get a firm grasp of it yet. You should actually write some sample codes to do so. Would it help if I say shader is a way to manipulate the positions and colours of pixels while we are drawing a 3D object? Maybe not? Don't worry. Just keep reading, you will get your eureka moment pretty soon. :)
Shader Programming
K, now we kind of know what shader is, but what does it mean to write a shader program? Let's look at Figure 1.1 again. In Figure 1.1, do you see that some stages are rectangular while the others are round? Round stages are what GPU (Graphics Processing Unit) does automatically for you, which means we programmers have no control over them. On the other hand, rectangular stages are what programmers can manipulate "freely". You get to write a function for each of those rectangles. This is what we call shader programming. So, you see there are only two rectangular stages in Figure 1.1, right? Yes, vertex and pixel shaders! So when someone talks about shader programming, he means writing a function for the Vertex Shader unit and another one for the Pixel Shader unit, that's it! [3]
Just like anything in the life, there are multiple shader languages out there, but what this book uses is HLSL(High Level Shader Language) from DirectX. HLSL uses C-like syntax and is very close to other shader languages, such as GLSL[4] and CgFX[5] . Once you learn HLSL, it is very trivial to switch to another shader languages.
The best way to learn a programming language is writing code. Debating over the philosophy and syntax of a language only makes beginners bored, uninterested or clueless. Once you feel the fun of coding in that new language, all the other things naturally follow. So I will not try to turn you off by listing all HLSL syntax at this moment. Instead, I will force you to write very easy shaders in HLSL first. If you are one of those people who cannot live without knowing all the syntax, please refer to the appendix at the very back. I really do not like to bore out people.
Well, I lied. There are still some initial setups we need to do. It is boring, I know. But you will need it to learn shader programming with this book, so please bear with me? It is not that long.
Preparation for Shader Programming
As mentioned in Introduction, the only focus of this book is shader programming. The reason why I decided not to cover anything about DirectX is because there are many good DirectX books out there, so I did not want to waste any of my time (and pages[6]) to discuss about it. Also I wanted to allow technical artists to learn HLSL programming through this book, so covering DirectX, mostly programmer-only material, was a no-no to me.
To allow technical artists to find this book useful, I separated each chapter into two steps. First step involves writing shader program in an application called Render Monkey from AMD. Both programmers and technical artists should do this step.
Second step, which is only for programmers, plugs the shaders authored in Render Monkey into a C++/DirectX framework. If you are a programmer who is not interested in C++/DirectX, feel free to skip this step, too.
Now, it is time to prepare something for these two steps.
Render Monkey
Render Monkey is a shader authoring tool provided by AMD. I found this tool great for quick prototyping. You can download version 1.82 from AMD website.
Just use the default option when install.
Optional: Simple DirectX Framework
If you are one of those braves wishing to run shaders in the C++/DirectX framework, please read this section.
First, install Visual C++ 2010 and DirectX SDK. If you do not have Visual C++, you can download the express version for free from Microsoft website. You can also download DirectX SDK from the same website.
Once you installed above two programs, open 01_DxFramework/BasicFramework.sln file from this book's code samples. (You can download them from my blog). If you just run this program, you will see something like Figure 1.2.
.png)
Figure 1.2. Super simple framework
This framework "supports" the following "features":
- Basic window functions, such as window creation and message loop
- Direct 3D device creation
- Resource loading, such as textures, models and shaders
- Simple game loop
- Simple keyboard input handling
By the way, this stripped-down framework is made to run shader codes quickly. As a result, all functions are in a single .cpp file, and it does not use any concept of OOP(Object Oriented Programming). In other words, everything is written in C-style and all variables are globally defined. You see the problem? Yes. IF YOU ARE MAKING A REAL GAME, NEVER EVER WRITE YOUR FRAMEWORK THIS WAY. Again, this framework is intentionally made very simple to allow you to run shader demos very quickly.
Alright, that was enough warning, I think. Now, let's take a look at the framework. First, open BasicFramework.h file.
//*************************************************************
//
// ShaderFramework.h
//
// Super simple C-style framework for Shader Demo
// (NEVER ever write framework like this when you are making real
// games.)
//
// Author: Pope Kim
//
//*************************************************************

#pragma once

#include <d3d9.h>
#include <d3dx9.h>

// ---------- constants ------------------------------------
#define WIN_WIDTH 800
#define WIN_HEIGHT 600

// ---------------- function prototype ------------------------

// Message procedure related
LRESULT WINAPI MsgProc( HWND hWnd, UINT msg, WPARAM wParam, LPARAM lParam );
void ProcessInput(HWND hWnd, WPARAM keyPress);

// Initialization-related
bool InitEverything(HWND hWnd);
bool InitD3D(HWND hWnd);
bool LoadAssets();
LPD3DXEFFECT LoadShader( const char * filename );
LPDIRECT3DTEXTURE9 LoadTexture(const char * filename);
LPD3DXMESH LoadModel(const char * filename);

// game loop related
void PlayDemo();
void Update();

// Rendering related
void RenderFrame();
void RenderScene();
void RenderInfo();

// cleanup related
void Cleanup();
This header file is very straight-forward. You probably noticed WIN_WIDTH and WIN_HEIGHT. These define the window size. All the other codes are just function declarations, and the implementations are all inside ShaderFramework.cpp. So let's take a look at ShaderFramework.cpp.
You can see all the global variables at the top of the file.
//---------------------------------------------------------------
// Globals
//---------------------------------------------------------------

// D3D-related
LPDIRECT3D9    gpD3D   = NULL;  // D3D
LPDIRECT3DDEVICE9 gpD3DDevice= NULL; // D3D device

// Fonts
ID3DXFont*    gpFont   = NULL;

// Models

// Shaders

// Textures

// Application name
const char*gAppName= "Super Simple Shader Demo Framework";
Now time to create the window.
//---------------------------------------------------------------
// Application entry point/message loop
//---------------------------------------------------------------

// entry point
INT WINAPI WinMain( HINSTANCE hInst, HINSTANCE, LPSTR, INT )
{
To create a windows, you need to register a window class first.
 // register windows class
 WNDCLASSEX wc = {sizeof(WNDCLASSEX), CS_CLASSDC, MsgProc, 0L, 0L,
         GetModuleHandle(NULL), NULL, NULL, NULL, NULL,
         gAppName, NULL };
 RegisterClassEx( &wc );
Now, it is time to create an instance of the window class that we just registered. CreateWindow() functions does this. Use WIN_WIDTH and WIN_HEIGHT for the width and height of the window, respectively.
 // creates program window
 DWORD style = WS_OVERLAPPED | WS_CAPTION | WS_SYSMENU | WS_MINIMIZEBOX;
 HWND hWnd = CreateWindow( gAppName, gAppName,
              style, CW_USEDEFAULT, 0, WIN_WIDTH, WIN_HEIGHT,
              GetDesktopWindow(), NULL, wc.hInstance, NULL );
The funny thing about a windowed program is that the actual area you can render onto is smaller than WIN_WIDTH and WIN_HEIGHT. It is because the window also has other junks like the title bar and border lines. So you need to adjust the window size once it is created so that the renderable area, or client rect, is equal to WIN_WIDTH and WIN_HEIGHT.
 // Client Rect size will be same as WIN_WIDTH and WIN_HEIGHT
 POINT ptDiff;
 RECT rcClient, rcWindow;

 GetClientRect(hWnd, &rcClient);
 GetWindowRect(hWnd, &rcWindow);
 ptDiff.x = (rcWindow.right - rcWindow.left) - rcClient.right;
 ptDiff.y = (rcWindow.bottom - rcWindow.top) - rcClient.bottom;
 MoveWindow(hWnd,rcWindow.left, rcWindow.top, WIN_WIDTH + ptDiff.x,
      WIN_HEIGHT + ptDiff.y, TRUE);
Now that we got the correct windows size, let's show the window!
 ShowWindow( hWnd, SW_SHOWDEFAULT );
 UpdateWindow( hWnd );
Next, we initialize Direct3D and load all D3D resources, such as textures, shaders and meshes. InitEverything() function contains all these things. If the program fails at initializing Direct3D or other stuff, it simply quits.
 // Initialize everything including D3D
 if( !InitEverything(hWnd) )
 {
  PostQuitMessage(1);
 }
Once D3D initialization is completed, what is left is to keep running the demo until WM_QUIT message is sent. WM_QUIT is a window message which nicely asks us to finish the execution of the program.
 // Message loop
 MSG msg;
 ZeroMemory(&msg, sizeof(msg));
 while(msg.message!=WM_QUIT)
 {
  if( PeekMessage( &msg, NULL, 0U, 0U, PM_REMOVE ) )
  {
   TranslateMessage( &msg );
   DispatchMessage( &msg );
  }
  else // If there's no message to handle, update and draw the game
  {
   PlayDemo();
  }
 }
When we need to finish the demo, we unregister the window class and return from the program.
 UnregisterClass( gAppName, wc.hInstance );
 return 0;
}
We also need to see the function that takes care of window messages.
// Message handler
LRESULT WINAPI MsgProc( HWND hWnd, UINT msg, WPARAM wParam, LPARAM lParam )
{
 switch( msg )
 {
keyboard input is handled by ProcessInput() function.
 case WM_KEYDOWN:
  ProcessInput(hWnd, wParam);
  break;
When the window is being closed, all D3D resources we loaded during the initialization step should be released by calling CleanUp() function. Once it is done, "please terminate this program" message is sent.
 case WM_DESTROY:
  Cleanup();
  PostQuitMessage(0);
  return 0;
 }
Any message that is not being handled by this function will be sent to the default message procedure, which will, in turn, handle them.
 return DefWindowProc( hWnd, msg, wParam, lParam );
}
The only keyboard input this framework listens to at this moment is ESC key. When this key is pressed, the program will be terminated.
// Keyboard input handler
void ProcessInput( HWND hWnd, WPARAM keyPress)
{
 switch(keyPress)
 {
  // when ESC key is pressed, quit the demo
 case VK_ESCAPE:
  PostMessage(hWnd, WM_DESTROY, 0L, 0L);
  break;
 }
}
Now, let's look at the initialization code more closely.
//------------------------------------------------------------
// intialization code
//------------------------------------------------------------
bool InitEverything(HWND hWnd)
{
First, we initialize D3D by calling InitD3D() function. Unless it fails, we call LoadAssets() function to load D3D resources, such as textures, models and shaders.
 // init D3D
 if( !InitD3D(hWnd) )
 {
  return false;
 }

 // loading models, shadsers and textures
 if( !LoadAssets() )
 {
  return false;
 }
Next up is font loading. We will use this font to display debug information on screen.
 // load fonts
 if(FAILED(D3DXCreateFont( gpD3DDevice, 20, 10, FW_BOLD, 1, FALSE,
             DEFAULT_CHARSET,OUT_DEFAULT_PRECIS,
             DEFAULT_QUALITY,(DEFAULT_PITCH | FF_DONTCARE),
             "Arial", &gpFont )))
 {
  return false;
 }

 return true;
}
The meanings of parameters used with D3DXCreateFont():
- gpD3DDevice: D3D device
- 20: the height of the font
- 10: the width of the font
- FW_BOLD: use bold style
- 1: mipmap level
- FALSE: do not use italic style
- DEFAULT_CHARSET: use default character set
- OUT_DEFAULT_PRECIS: defines how close the final font properties displayed on the screen should be to the ones we are setting here
- DEFAULT_QUALITY: defines how close the final font quality displayed on the screen to the one we are setting here
-
DEFAULT_PITCH FF_DONTCARE: Use default pitch, and I don't care about the font family - "Arial": the name of font to use
- gpFont: stores the newly created font
Now let's take a look at InitD3D() function, which creates a D3D object and D3D device. In order to load resources or draw with DirectX, you must create a D3D device.
// D3D and device initialization
bool InitD3D(HWND hWnd)
{
First, we create a Direct3D object.
 // D3D
 gpD3D = Direct3DCreate9( D3D_SDK_VERSION );
 if ( !gpD3D )
 {
  return false;
 }
Now, we need to fill in the structure to create a D3D device.
 // fill in the structure needed to create a D3D device
 D3DPRESENT_PARAMETERS d3dpp;
 ZeroMemory( &d3dpp, sizeof(d3dpp) );

 d3dpp.BackBufferWidth  = WIN_WIDTH;
 d3dpp.BackBufferHeight = WIN_HEIGHT;
 d3dpp.BackBufferFormat = D3DFMT_X8R8G8B8;
 d3dpp.BackBufferCount  = 1;
 d3dpp.MultiSampleType  = D3DMULTISAMPLE_NONE;
 d3dpp.MultiSampleQuality = 0;
 d3dpp.SwapEffect  = D3DSWAPEFFECT_DISCARD;
 d3dpp.hDeviceWindow  = hWnd;
 d3dpp.Windowed  = TRUE;
 d3dpp.EnableAutoDepthStencil = TRUE;
 d3dpp.AutoDepthStencilFormat = D3DFMT_D24X8;
 d3dpp.Flags   = D3DPRESENTFLAG_DISCARD_DEPTHSTENCIL;
 d3dpp.FullScreen_RefreshRateInHz= 0;
 d3dpp.PresentationInterval = D3DPRESENT_INTERVAL_ONE;
Here are some fields worth understanding:
- BackBufferWidth: the width of back buffer(rendering area)
- BackBuferHeight: the height of back buffer
- BackBufferFormat: the format of back buffer
- AutoDepthStencilFormat: the format of depth/stencil buffer
- SwapEffect: the effect of swap. For performance reasons, D3DSWAPEFFECT_DISCARD is recommended.
- PresentationInterval: the relationship between the refresh rate of monitor and the frequency of swapping back buffer. D3DPRESENT_INTERVAL_ONE means back buffer will be swapped whenever monitory v-sync happens. Most computer games swap the back buffer without waiting for V-sync. (D3DPRESENT IMMEDIATE) It is mainly for performance reasons. The most noticeable downside of this mode is the screen tearing
Now that we have this structure filled, we can create a D3D device.
 // create D3D device
 if( FAILED( gpD3D->CreateDevice( D3DADAPTER_DEFAULT, D3DDEVTYPE_HAL,
                 hWnd,
                 D3DCREATE_HARDWARE_VERTEXPROCESSING,
                 &d3dpp, &gpD3DDevice ) ) )
 {
  return false;
 }

 return true;
}
LoadAssets() function is supposed to load D3D resources, but there is no code in it at this moment. You will get to call other functions, such as LoadShader(), LoadTexture() and LoadModel(), to load resources in the later chapters.
bool LoadAssets()
{
 // texture loading

 // shader loading

 // model loading

 return true;
}
Next is LoadShader() function, which loads a shader program saved in a .fx file. A .fx file is a text file which can contain both vertex and pixel shader functions. It can be dynamically compiled and loaded via D3DXCreateEffectFromFile() function. So, if there is any syntax error in HLSL code you write, this function will encounter compiler errors. The last parameter of this function is how you retrieve the error messages. We will print out the error messages in Visual C++'s output window.
// shader loading
LPD3DXEFFECT LoadShader(const char * filename )
{
 LPD3DXEFFECT ret = NULL;

 LPD3DXBUFFER pError = NULL;
 DWORD dwShaderFlags = 0;

#if _DEBUG
 dwShaderFlags |= D3DXSHADER_DEBUG;
#endif

 D3DXCreateEffectFromFile(gpD3DDevice, filename,
             NULL, NULL, dwShaderFlags, NULL, &ret, &pError);

 // if failed at loading shaders, display compile error
 // to output window
 if(!ret && pError)
 {
  int size= pError->GetBufferSize();
  void *ack= pError->GetBufferPointer();

  if(ack)
  {
   char* str = new char[size];
   sprintf(str, (const char*)ack, size);
   OutputDebugString(str);
   delete [] str;
  }
 }

 return ret;
}
The meanings of the parameters of D3DXCreateEffectFromFile() function are:
- gpD3DDevice: D3D device
- filename: the name of shader file to load
- NULL: do not use additional #define definitions for shader compilation
- NULL: do not use additional #includes
- dwShaderFlags: shader compilation flags
- NULL: do not use an effect pool object for shared parameters
- ret: will store compiled shader
- pError: will point to error messages, if any
Next is model loading code. It assumes models are stored in .x format, which is supported by DirectX natively.
// loading models
LPD3DXMESH LoadModel(const char * filename)
{
 LPD3DXMESH ret = NULL;
 if ( FAILED(D3DXLoadMeshFromX(filename,D3DXMESH_SYSTEMMEM, gpD3DDevice,
                NULL,NULL,NULL,NULL, &ret)) )
 {
  OutputDebugString("failed at loading a model: ");
  OutputDebugString(filename);
  OutputDebugString("\n");
 };

 return ret;
}
Again, the meaning of the above parameters for D3DXLoadMeshFromX() function call are:
- D3DXMESH_SYSTEMMEM: load the mesh to system memory
- gpD3DDevice: D3D device
- NULL: Don't give me adjacency data
- NULL: Don't give me material information
- NULL: Don't give me effect instance
- NULL: Don't give me the number of materials
- ret: will store loaded mesh
Finally, let's look at LoadTexture(), which loads a texture(image) file.
// loading textures
LPDIRECT3DTEXTURE9 LoadTexture(const char * filename)
{
 LPDIRECT3DTEXTURE9 ret = NULL;
 if ( FAILED(D3DXCreateTextureFromFile(gpD3DDevice, filename, &ret)) )
 {
  OutputDebugString("failed at loading a texture: ");
  OutputDebugString(filename);
  OutputDebugString("\n");
 }

 return ret;
}
Next is our game loop function, PlayDemo(). This function is called whenever there is no window message to handle. For real games, you would calculate the elapsed time since last frame and use it for both update and rendering functions, but it is omitted here for simplicity.
//------------------------------------------------------------
// game loop
//------------------------------------------------------------
void PlayDemo()
{
 Update();
 RenderFrame();
}
There is nothing in Update() function yet. One day, we will add something in here.
// Game logic update
void Update()
{
}
Next is RenderFrame() function, which draws stuff onto screen.
//------------------------------------------------------------
// Rendering
//------------------------------------------------------------

void RenderFrame()
{
We first clear the back buffer with blue colour.
 D3DCOLOR bgColour = 0xFF0000FF;// background colour - blue

 gpD3DDevice->Clear( 0, NULL, (D3DCLEAR_TARGET | D3DCLEAR_ZBUFFER),
           bgColour, 1.0f, 0 );
Then, we draw our scene and debug info.
 gpD3DDevice->BeginScene();
 {
  RenderScene();  // draw 3D objects and so on
  RenderInfo();  // show debug info
 }
 gpD3DDevice->EndScene();
Once rendering is done, we simply present what is drawn onto the back buffer to the screen.
 gpD3DDevice->Present( NULL, NULL, NULL, NULL );
}
Just like Update() function, there is no code in RenderScene() function yet. We will write some code here in the next chapter to draw a 3D object.
// draw 3D objects and so on
void RenderScene()
{
}
RenderInfo() function simply displays key mapping information onto the screen.
// show debug info
void RenderInfo()
{
 // text colour
 D3DCOLOR fontColor = D3DCOLOR_ARGB(255,255,255,255);

 // location to show the text
 RECT rct;
 rct.left=5;
 rct.right=WIN_WIDTH / 3;
 rct.top=5;
 rct.bottom = WIN_HEIGHT / 3;

 // show debug keys
 gpFont->DrawText(NULL, "Demo Framework\n\nESC: Quit demo", -1, &rct, 0,
         fontColor);
}
When the program is being shut down, we must release all D3D resources to prevent memory leak. Once all resources are released, the D3D device and the D3D object need to be released too.
//------------------------------------------------------------
// cleanup code
//------------------------------------------------------------

void Cleanup()
{
 // release fonts
 if(gpFont)
 {
  gpFont->Release();
  gpFont = NULL;
 }

 // release models

 // release shaders

 // release textures

 // release D3D
 if(gpD3DDevice)
 {
  gpD3DDevice->Release();
  gpD3DDevice = NULL;
 }

 if(gpD3D)
 {
  gpD3D->Release();
  gpD3D = NULL;
 }
}
That is it. We just finished writing a very simple framework. Even if you do not understand above code very well, that is completely fine. It does not really prevent you from learning HLSL with this book. But if your dream is to be a rendering dude, I highly recommend you to learn DirectX properly after finishing this book.
Thank you so much for suffering through the boring preparation steps. After the following quick summary, you we are off to the next chapter, where you will actually have some fun making something to show up on the screen!
Summary
The short summary of what we discussed in this chapter:
- Shaders are functions calculating the position and colour of each pixel.
- If you think shaders in terms of a painter's workflow, vertex shader is perspective sketch and pixel shader is colouring.
- Shader programming is nothing more than writing functions which are executed by vertex and pixel shading units.
- Render Monkey is a great tool for quick shader prototyping.
Footnotes:
- I intentionally over-simplified this figure to help you understand the roles of vertex and pixel shaders. Real 3D graphics pipelines are way more complicated than this.
- Vertex shaders often outputs more information than just vertex positions. You will see more of it in the following chapters.
- New shader types are introduced with DirectX 10 and 11. But they are not for beginners and currently not being used enough in real-world to be included in this book.
- It stands for OpenGL Shader Language. As the name suggests, it is OpenGL's shader language, which is somewhat different from HLSL syntax-wise.
- It is a shader programming language supported by NVidia. It is almost identical to HLSL except a few things.
- More pages = higher price = less beer = sadder life