05. Let's Add Colors to Objects: Diffuse/Specular Shader


Why do different objects have different colors? It is because they absorb and reflect different spectrums of incoming light. For example, a black surface looks black because it absorbs all the spectrums, and a white surface is white because it reflects everything. Likewise, a red surface reflects red spectrum while absorbing the others.
Then how do we represent this absorption property in shader? If a surface has only one uniform color across its surface, we can just use a global variable for this, right? However, most surfaces have more complicated patterns than this. This means that each pixel needs to have a different color. So let's think it this way. We are going to “draw” an image on a surface, and this image defines which color will be reflected on each pixel. Once this image is saved as a texture, we can look it up inside a pixel shader and apply it to the lighting result.
Do you remember that we calculated diffuse and specular light separately in Chapter 4? Then do you think we need to multiply this texture to the sum of diffuse and specular light or not? As mentioned earlier, the reason why we can recognize an object is mainly due to diffuse lighting. (On the other hand, the specular light adds a tight highlight to it.) Therefore, it is good enough to apply the texture to the diffuse lighting result only. Since this texture is only applied to diffuse lighting, we will call it diffuse map.
Then how about specular lighting? It is okay to use the same diffuse map for specular lighting, too, but usually different textures are used for specular lighting for the following two reasons. First, some surfaces reflect different spectrums for diffuse and specular lighting. Second, specular maps are often used to turn off specularity on certain pixels without affecting diffuse light, which is more globally applied. One great example is our face. When you observe specular light on a human face, do you expect to see a smooth highlight without any noise as shown in Chapter 4? If you look into a mirror, you will see the forehead and nose have more specularity. Furthermore, you will see not all the part of your nose or forehead has visible specularity. It is because your face is not perfect due to pores and facial hair. With specular mapping, this effect can be simulated to some degree. So, we will be using two separate diffuse and specular maps in this chapter.
There is another thing that affects the color of an object: the light color. If you cast a red light on a white object, the object looks reddish, right? The color of light can be easily defined as a global variable.
What we discussed so far can be summed like this:
Final diffuse = light color X amount of diffuse lighting X diffuse map
Final specular = light color X amount of specular lighting X specular map
Then, with the above knowledge under our belt, let's write diffuse/specular mapping shader now.
Initial Step-by-Step Setup
First, make a copy of the RenderMonkey project used in the last chapter, and save it inside another folder. If you forgot to save it in the last chapter, you can use samples\04_lighting\lighting.rfx file from the accompanying code samples.
Now open this file inside RenderMonkey, and change the effect name to SpecularMapping. Once the name is changed, it's time to add images that will be used as diffuse and specular maps. Right-click on the effect name, and select Add Texture > Add 2D Texture > Fieldstone.tga file from the pop-up menu. Now you will see a texture, named Fieldstone. Change the name to DiffuseMap.
Then right-click on Pass 0 and select Add Texture Object > DiffuseMap. You will see a texture object, named Texture0. Change the name to DiffuseSampler.
We need to add a specular map now, but I was not able to find a good candidate from the RenderMonkey installation folder. So I handmade a specular map and included with the accompanying code samples. Let's take a look at how this specular map looks like first, side by side with the diffuse map.
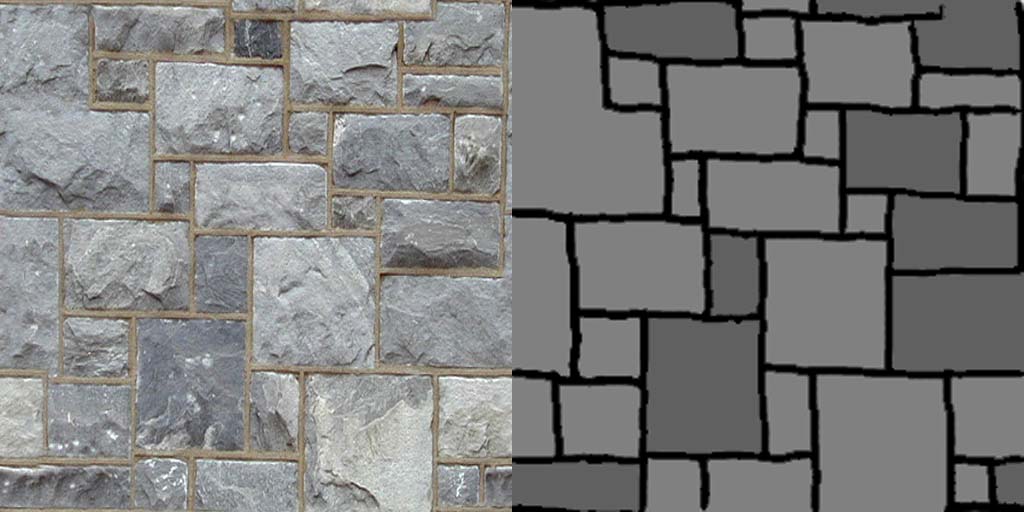
Figure 5.1 Diffuse map (left) and specular map (right)
Do you see the seams between stone bricks are colored in black in the specular map? These seams won't reflect any specular light. (Still, there is diffuse light as you can guess from the diffuse map.) One thing to note here is that textures do not always contain color information, as you can see with the specular map in Figure 5.1. The information stored in a specular map is not color; instead, it defines the amount of specular light that will be reflected from each pixel. Similarly, it is very common to use a texture map if there are variables that need to be controlled on each pixel. You will see this technique again later when we are implementing normal mapping.
Tip: Use textures for the variables that need to be controlled per pixel.
Then, find Samples\05_DiffuseSpecularMapping\Fieldstone_SM.tga file from the accompanying code samples and add it to the RenderMonkey project. To do so, you can simply drag and drop the file onto the effect name. Also change the texture name to SpecularMap, and texture object name to SpecularSampler.
Next, we will add the light color. Right-click on the effect name and select Add Variable > Float > Float3. The variable name will be gLightColor. Now double-click on the variable to assign some value. To make it emit bluish light, we will use (0.7, 0.7, 1.0) for the light color.
Last up is Stream Mapping. Unlike in Chapter 4, a texture is used here, so UV coordinates are needed. Double-click on Stream Mapping to add TEXCOORD0. The data type is float2, of course. Once all the above steps are finished, your RenderMonkey Workspace should look like Figure 5.2.
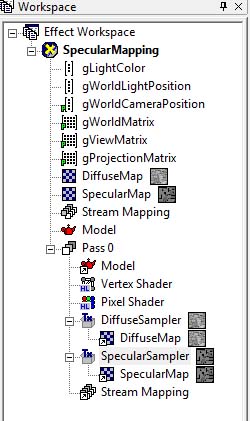
Figure 5.2 RenderMonkey project after the initial setup
Vertex Shader
Now let's look at vertex shader. I will show you the full source code first, and explain newly added code.
float4x4 gWorldMatrix;
float4x4 gViewMatrix;
float4x4 gProjectionMatrix;

float4 gWorldLightPosition;
float4 gWorldCameraPosition;

struct VS_INPUT
{
  float4 mPosition : POSITION;
  float3 mNormal: NORMAL;
  float2 mUV: TEXCOORD0;
};

struct VS_OUTPUT
{
  float4 mPosition : POSITION;
  float2 mUV: TEXCOORD0;
  float3 mDiffuse : TEXCOORD1;
  float3 mViewDir: TEXCOORD2;
  float3 mReflection: TEXCOORD3;
};

VS_OUTPUT vs_main( VS_INPUT Input )
{
  VS_OUTPUT Output;

  Output.mPosition = mul( Input.mPosition, gWorldMatrix );

  float3 lightDir = Output.mPosition.xyz - gWorldLightPosition.xyz;
  lightDir = normalize(lightDir);

  float3 viewDir = normalize(Output.mPosition.xyz - gWorldCameraPosition.xyz);
  Output.mViewDir = viewDir;

  Output.mPosition = mul( Output.mPosition, gViewMatrix );
  Output.mPosition = mul( Output.mPosition, gProjectionMatrix );

  float3 worldNormal = mul( Input.mNormal, (float3x3)gWorldMatrix );
  worldNormal = normalize(worldNormal);

  Output.mDiffuse = dot(-lightDir, worldNormal);
  Output.mReflection = reflect(lightDir, worldNormal);

  Output.mUV = Input.mUV;

  return Output;
}
Was there any new global variables that needs be added? Yes, a light color and two texture samplers. Texture samplers are used in pixel shader, so they don't need to be declared here. Then what about the light color? It can simply be multiplied inside pixel shader, right? So, nothing to be added here!
Then how about the input/output structure? There was one thing to add: the UV coordinates. It will be used by pixel shader to sample textures. Let's add the following line to both input and output structures of the vertex shader.
float2 mUV: TEXCOORD0;
We also need to add only one line to vertex shader function. The below line passes the UV coordinates to pixel shader.
Output.mUV = Input.mUV;
Pretty simple, right? That's it for vertex shader.
Pixel Shader
As we did earlier, full pixel shader code is listed first, followed by explanation on newly added code.
struct PS_INPUT
{
  float2 mUV : TEXCOORD0;
  float3 mDiffuse : TEXCOORD1;
  float3 mViewDir: TEXCOORD2;
  float3 mReflection: TEXCOORD3;
};

sampler2D DiffuseSampler;
sampler2D SpecularSampler;

float3 gLightColor;

float4 ps_main(PS_INPUT Input) : COLOR
{
  float4 albedo = tex2D(DiffuseSampler, Input.mUV);
  float3 diffuse = gLightColor * albedo.rgb * saturate(Input.mDiffuse);

  float3 reflection = normalize(Input.mReflection);
  float3 viewDir = normalize(Input.mViewDir);
  float3 specular = 0;
  if ( diffuse.x > 0 )
  {
   specular = saturate(dot(reflection, -viewDir ));
   specular = pow(specular, 20.0f);

   float4 specularIntensity = tex2D(SpecularSampler, Input.mUV);
   specular *= specularIntensity.rgb * gLightColor;
  }

  float3 ambient = float3(0.1f, 0.1f, 0.1f) * albedo;

  return float4(ambient + diffuse + specular, 1);
}
First, we will globally declare three variables which were added to RenderMonkey.
sampler2D DiffuseSampler;
sampler2D SpecularSampler;

float3 gLightColor;
Then, add UV coordinates to PS_INPUT.
float2 mUV : TEXCOORD0;
Now, it's time to sample the diffuse map. Add the following line to the top of the pixel shader function.
float4 albedo = tex2D(DiffuseSampler, Input.mUV);
The sampling result, albedo, is the color which current pixel reflects. I said we need to multiply this to diffuse lighting amount and light color, right? Change the previous code, which was calculating diffuse, to this:
float3 diffuse = gLightColor * albedo.rgb * saturate(Input.mDiffuse);
Now press F5 twice to compile the vertex and pixel shaders, separately. Then look at the preview window.
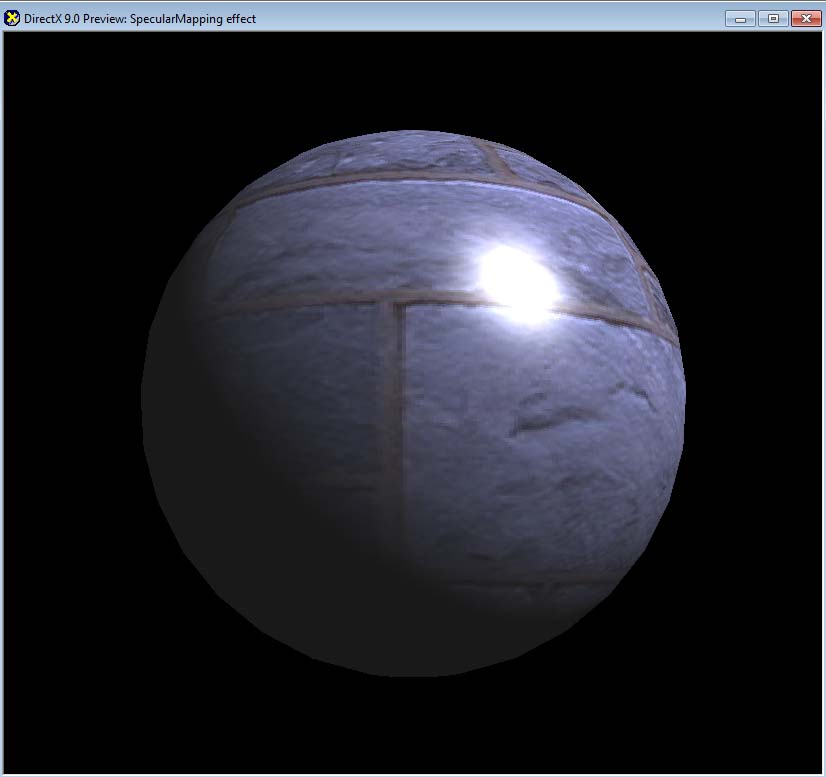
Figure 5.3 Result with diffuse map only
You should be able to see the brick wall texture, as well as the bluish light. However, the specular lighting does not look right. Even the seams have specular light! It's probably because we haven't applied the specular map yet. Then let's add the specular map.
Tip: How to Rotate an Object in Preview Window To cast specular light in the seams like Figure 5.3, you will need to rotate the object. To rotate an object in Preview window, move the mouse around while holding down left mouse button inside the window. If you want translation or scaling instead of rotation, click on the second right icon from the toolbar to switch to Overloaded Camera Mode.
Add the following code, which samples the specular map, below where we did pow() on specular.
float4 specularIntensity = tex2D(SpecularSampler, Input.mUV);
We need to multiply this, as well as the light color, to specular, right? The code doing it is shown below.
   float4 specularIntensity = tex2D(SpecularSampler, Input.mUV);
   specular *= specularIntensity.rgb * gLightColor;
Another problem with the result shown in Figure 5.3 is that the details of diffuse texture disappear when the diffuse light disappears. It is because (0.1, 0.1, 0.1) is used for the ambient light. Since ambient light is indirect light hitting the surface, it should be modulated by the diffuse map, as well. Find the code where ambient is calculated and change the code like this:
float3 ambient = float3(0.1f, 0.1f, 0.1f) * albedo;
Again, compile the vertex and pixel shaders, and see the preview window.
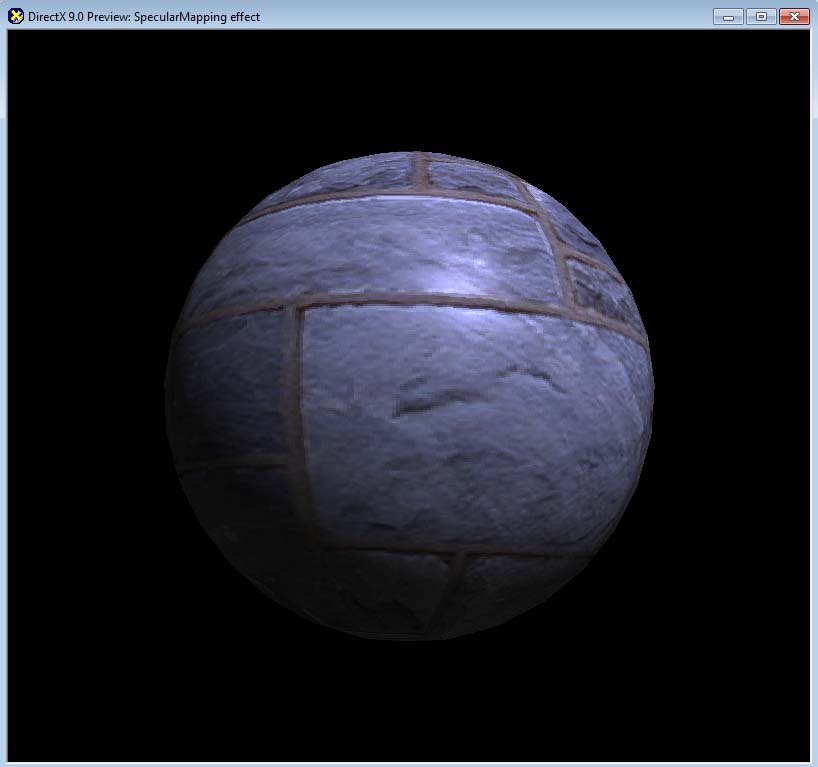 Figure 5.4 Result with diffuse/specular map and ambient light
You see the obvious difference from Figure 5.3, right? Specular light is not that strong anymore, and the seams look perfect, too! In addition, you can see the traits of diffuse map in the very dark pixels, too.
(Optional) DirectX Framework
This is an optional section for readers who want to use shaders in a C++ DirectX framework.
First, make a copy of the framework used in Chapter 4 and save it into a new folder. Next, save the shader and 3D model that we used in RenderMonkey into Sphere.x and SpecularMapping.fx files so that they can be used in the DirectX framework. Also copy and paste two textures used in RenderMonkey into the framework folder. Filedstone_DM.tga and Fieldstone_SM.tga will be the file names.
Now open the Visual C++ solution, and change all instances of gpLightingShader variable to gpSpecularMappingShader in the source code.
Next, go to the global variable section to declare pointers to the two textures and a variable to store the light color, as shown below:
// Textures
LPDIRECT3DTEXTURE9    gpStoneDM  = NULL;
LPDIRECT3DTEXTURE9    gpStoneSM  = NULL;

// light color
D3DXVECTOR4        gLightColor(0.7f, 0.7f, 1.0f, 1.0f);
You see that we are using the exact same bluish color, (0.7, 0.7, 1.0), for the light, right? Now we will add some code to release newly added 3D resources: two textures declared above. Add the following code to CleanUp() function.
  // release textures
  if ( gpStoneDM )
  {
    gpStoneDM->Release();
    gpStoneDM = NULL;
  }

  if ( gpStoneSM )
  {
    gpStoneSM->Release();
    gpStoneSM = NULL;
  }
Now, it is time to load D3D resources. Add the next line to LoadAssets() function.
  // loading textures
  gpStoneDM = LoadTexture("Fieldstone_DM.tga");
  if ( !gpStoneDM )
  {
    return false;
  }

  gpStoneSM = LoadTexture("Fieldstone_SM.tga");
  if ( !gpStoneSM )
  {
    return false;
  }
Don't forget to change the shader file to SpecularMapping.fx, too.
gpSpecularMappingShader = LoadShader("SpecularMapping.fx");
Lastly, we are going to look at RenderScene() function. The shader is doing all the work already, so we can simply assign new variables. Remember where SetMatrix() function was called before? Add the following code below those function calls.
  gpSpecularMappingShader->SetVector("gLightColor", &gLightColor);
  gpSpecularMappingShader->SetTexture("DiffuseMap_Tex", gpStoneDM);
  gpSpecularMappingShader->SetTexture("SpecularMap_Tex", gpStoneSM);
The above code passes the light color and two textures to the shader. You still remember that _Tex postfix must be added while assigning a texture map, right? It was mentioned in Chapter 3.
If you compile and execute the program, you will see the same result you saw in RenderMonkey.
As you probably know by now, there is not much to do in a DirectX Framework when shaders are used. Loading D3D resources and managing shader variables and render states are the only things that the framework should take care of.
Summary
- The reason why we can recognize the color of an object is because different objects absorb and reflect different spectrums of a light.
- In 3D graphics, diffuse and specular maps are used to simulate the absorption and reflection of light. Specular map mainly controls the amount of specular light reflection on each pixel.
- Light color also contributes to the final color.
- Textures don't always store color information. A specular map is a good example of this exception.
This chapter was pretty easier than we thought, right? It's because we started from the lighting shader implemented in last chapter. Like diffuse and specular mapping, there are many techniques that can be implemented very easily by extending some basic shaders.
However, do not take the material covered in this chapter lightly. Most recent games mix this technique with normal mapping to create pretty impressive visuals.